In this blog post, we will show how to use the diffusers library to upscale images using the Stable Diffusion Upscaler model. The model is a diffusion-based super-resolution model that is capable of generating high-quality upscaled images.
The diffusers library provides a simple and easy-to-use interface for working with the Stable Diffusion Upscaler model. This blogpost will assume you have installed the diffusers library and have access to a GPU. If you haven’t installed the library yet, follow the instructions to install the library in the official documentation. You can also take a look at my [blog post]/2023/09/16/How-I-Ran-Textual-Inversion.html, which covers how to set up the library on an AWS EC2 instance.
Let us get started with imports and setting up a pipeline to do the upscaling. The pipeline will take care of loading the models and weights and provide a simple interface that takes as input an image and returns the upscaled image.
from PIL import Image
import numpy as np
from diffusers import StableDiffusionUpscalePipeline
import torch


# load model and scheduler
model_id = "stabilityai/stable-diffusion-x4-upscaler"
pipeline = StableDiffusionUpscalePipeline.from_pretrained(
    model_id, revision="fp16", torch_dtype=torch.float16,

)
pipeline = pipeline.to("cuda")
/home/ubuntu/fusion/lib/python3.8/site-packages/diffusers/pipelines/pipeline_utils.py:269: FutureWarning: You are loading the variant fp16 from stabilityai/stable-diffusion-x4-upscaler via `revision='fp16'` even though you can load it via `variant=`fp16`. Loading model variants via `revision='fp16'` is deprecated and will be removed in diffusers v1. Please use `variant='fp16'` instead.
  warnings.warn(
text_encoder/model.safetensors not found
Loading pipeline components...: 100%|██████████| 6/6 [00:01<00:00,  5.41it/s]
/home/ubuntu/fusion/lib/python3.8/site-packages/diffusers/pipelines/stable_diffusion/pipeline_stable_diffusion_upscale.py:130: FutureWarning: The configuration file of the vae does not contain `scaling_factor` or it is set to 0.18215, which seems highly unlikely. If your checkpoint is a fine-tuned version of `stabilityai/stable-diffusion-x4-upscaler` you should change 'scaling_factor' to 0.08333 Please make sure to update the config accordingly, as not doing so might lead to incorrect results in future versions. If you have downloaded this checkpoint from the Hugging Face Hub, it would be very nice if you could open a Pull Request for the `vae/config.json` file
  deprecate("wrong scaling_factor", "1.0.0", deprecation_message, standard_warn=False)
Let us download an image of a sunflower head and use it as an example for super-resolution. The image contains a lot of texture and detail, which makes it a good candidate to demonstrate the capabilities of the Stable Diffusion model for super-resolution.
!wget https://upload.wikimedia.org/wikipedia/commons/4/44/Helianthus_whorl.jpg
--2024-02-01 23:40:22--  https://upload.wikimedia.org/wikipedia/commons/4/44/Helianthus_whorl.jpg
Resolving upload.wikimedia.org (upload.wikimedia.org)... 198.35.26.112, 2620:0:863:ed1a::2:b
Connecting to upload.wikimedia.org (upload.wikimedia.org)|198.35.26.112|:443... connected.
HTTP request sent, awaiting response... 200 OK
Length: 327296 (320K) [image/jpeg]
Saving to: ‘Helianthus_whorl.jpg’

Helianthus_whorl.jp 100%[===================>] 319.62K  --.-KB/s    in 0.02s

2024-02-01 23:40:22 (19.4 MB/s) - ‘Helianthus_whorl.jpg’ saved [327296/327296]
img = Image.open('Helianthus_whorl.jpg')
img.size
(640, 480)
The model upscales to 4x the initial size (hence stable-diffusion-x4-upscale) so let us downscale the image to a quarter of the original dimensions and then rescale using the model.
new_size = tuple(np.floor_divide(img.size, 4).astype('int'))
low_res_img = img.resize(new_size)
low_res_img.size
(160, 120)
We can see that the downscaled image is quite blurry with a lot of the textural details lost.
import matplotlib.pyplot as plt
import numpy as np

# List of image arrays
image_arrays = [img, low_res_img]
titles = ["Original Image", "Downscaled Image" ]

# Create subplots
fig, axes = plt.subplots(1, len(image_arrays), figsize=(15, 5))

# Iterate over image arrays and titles
for i, (img_array, title) in enumerate(zip(image_arrays, titles)):
    axes[i].imshow(img_array)
    axes[i].set_title(title)
    axes[i].axis('off')

# Adjust layout and display the plot
plt.tight_layout()
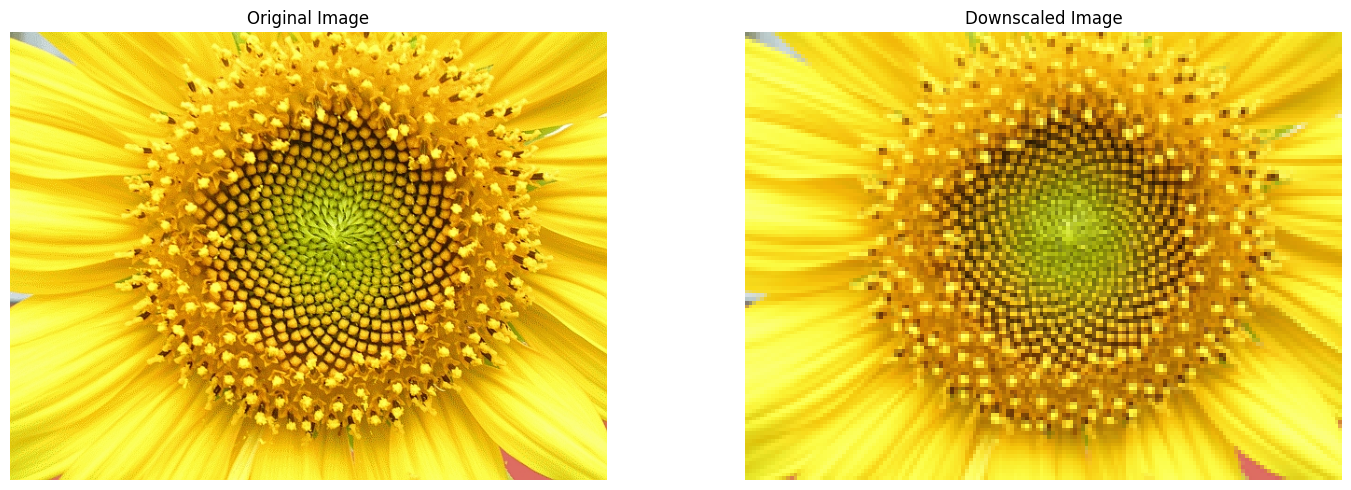
Image credit: L. Shyamal, CC BY-SA 2.5 https://creativecommons.org/licenses/by-sa/2.5, via Wikimedia Commons
Upscaling using the super-resolution model is a simple matter of calling pipeline with the prompt and image. There are other settings that can be adjusted such as the number of iterations and the number of images to generate. Refer to the documentation for more details. Here we will use the default settings of a single image and 75 iterations.
line = pipeline(prompt = 'Sunflower head displaying the floret arrangement',
                          image= low_res_img)

upscaled_image = line.images[0]
100%|██████████| 75/75 [00:13<00:00, 5.42it/s]
Since this model increases the size of the image by 4x and the input was the original image downscaled by 4x, the super-resolved image should be the same size as the original image.
upscaled_image.size
(640, 480)
Below we plot the downscaled input image, the downscaled image resized using bicubic interpolation, the super-resolution model output and the original image.
import matplotlib.pyplot as plt
# List of image arrays

image_arrays = [low_res_img, low_res_img.resize(img.size), upscaled_image, img]
titles = ["Downscaled", "Bicubic interpolation", "Super-resolution", "Original"]

# Create subplots
fig, axes = plt.subplots(2, 2, figsize=(15, 15))
axes = axes.ravel()

# Iterate over image arrays and titles
for i, (img_array, title) in enumerate(zip(image_arrays, titles)):
    axes[i].imshow(img_array)
    axes[i].set_title(title, fontsize=16)
    axes[i].axis('off')

# Adjust layout and display the plot
plt.tight_layout()
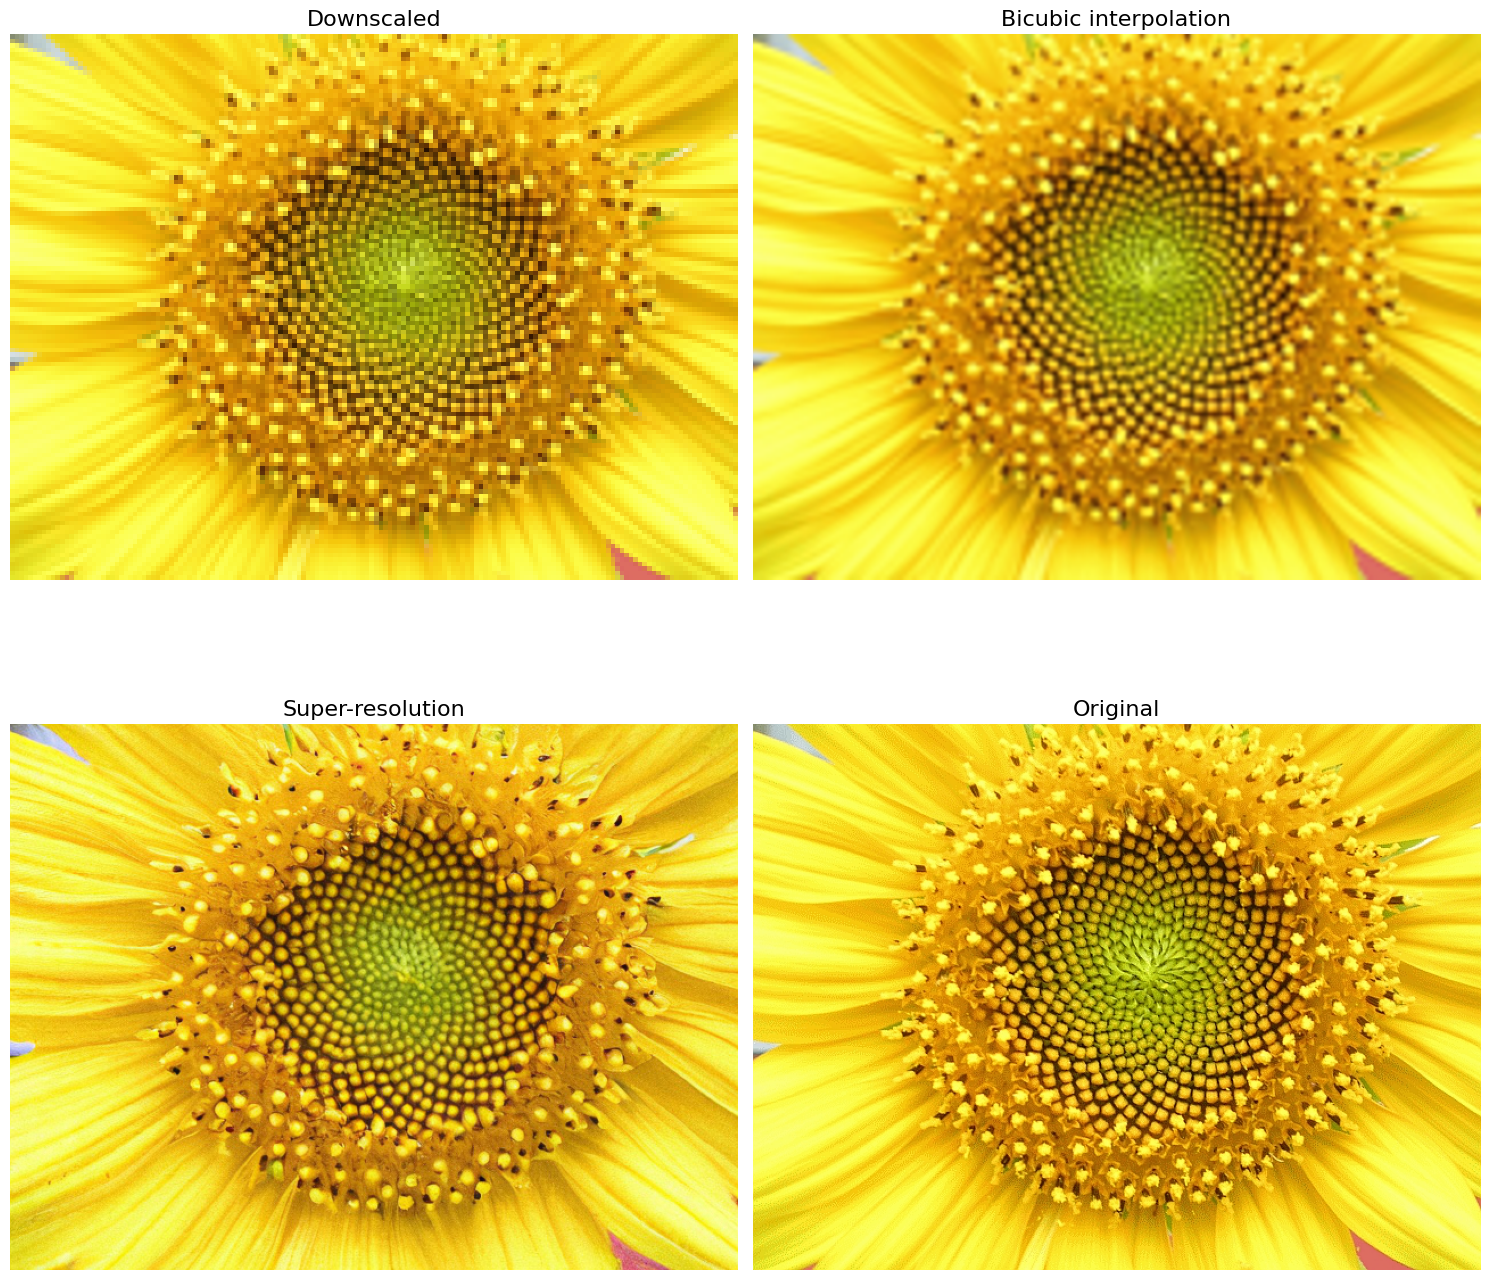
Image credit: L. Shyamal, CC BY-SA 2.5 https://creativecommons.org/licenses/by-sa/2.5, via Wikimedia Commons
It can be seen that the super-resolved image is superior to the one rescaled using bicubic interpolation and restores a lot of the textural detail that had gotten lost during downscaling. However it is not perfect. For example, the innermost florets have the same shape as the outer ones, whereas in the original image they are pointy and directed inwards. This area in the downscaled image is quite blurred and the model fails to recover the details of the original image.
In this simple example, we have only touched on the basics of diffusion-based super-resolution and the capabilities of the Stable Diffusion Upscaler model in order to get you started. I encourage you to explore the various settings and options that can be adjusted to obtain different and possibly better results.